Thinking about starting a blog in 2025? You’re not alone. With over 600 million blogs online and growing, more people than ever are turning their ideas into digital platforms—and income streams.
But here’s the truth: while starting a blog is easier than ever, start blogging and making money from one requires clarity, focus, and a smart game plan. Too many beginners give up after writing a few posts that no one reads or picking a niche that doesn’t align with their audience—or income goals.
That’s where this guide comes in.
At nichesteps.com, we help beginners build profitable blogs using WordPress—from choosing the right niche and hosting plan to publishing high-quality content that drives traffic and revenue. Whether you want to blog about parenting, personal finance, fitness, food, tech, or even life lessons—you can build a blog that gets read and pays off.
Whether you’re a college student, a stay-at-home parent, or a full-time entrepreneur, start a blog gives you a low-cost, high-upside way to share your knowledge, connect with people, and grow your income over time. so let’s see In this step-by-step guide, what you’ll learn:
This isn’t just a guide for starting. It’s a roadmap for growing a blog that works for you, even if you’re starting from zero.
Let’s walk through step one now.
Step 1 : Choose Your Blog’s Niche.
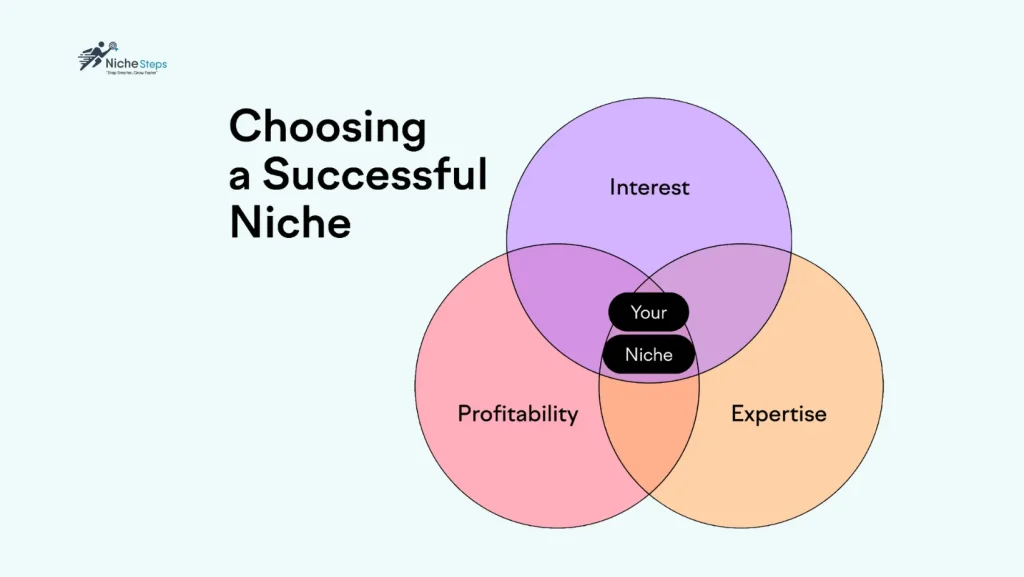
One of the biggest reasons new blogs fail is because they never define a clear, profitable niche. In 2025, blogging without a focused topic is like launching a business without a product—no direction, no audience, and no traction.
Your niche determines what you write about, who you serve, and how you eventually make money.
How to Choose the Right Niche ?
It’s not always easy—especially if you have lots of interests. Use these questions to narrow it down:
- Is it popular?
Use tools like Google Trends or Ubersuggest to gauge demand. A niche without search interest is hard to grow. - Is it specific enough?
Broad topics like “health” or “business” are competitive. Narrow down to something like “plant-based meal prep” or “freelance design for tech startups.” - Do people spend money in this niche?
Consider whether people buy courses, products, or services related to your niche. If so, it’s likely monetizable. - Do you enjoy it enough to create long-term content?
You’ll be writing about this topic a lot. Make sure it’s something you genuinely like, are curious about, or have experience in.
"For the Niches, I recommend Blogging and Online Business—it’s what I use for this blog."
Read More : How to Choose a Blog Niche and Create a Memorable Brand ?
Now that you’ve identified your niche to start blogging and make money and the audience you want to serve is identified , it’s time to turn that idea into something real.
Let’s move on to the next step—choosing the perfect domain name and hosting provider to bring your blog to life.
Step 2 : Choose The Right domain name and web hosting
Why This Step Matters ?
You’ve chosen your niche and are ready to begin—now it’s time to claim your space on the internet. But don’t underestimate this decision. Your domain name and web hosting are foundational to your blog’s success.
Get them wrong, and you’ll run into branding issues, slow site speed, and even security problems. Get them right, and your blog will be built on a professional, trustworthy, and scalable platform from day one.
This step is about setting the stage for everything that follows so let’s see what hosting actually is, how it works behind the scenes, and why choosing the right host will save you time, money, and technical headaches. We’ll also walk you through the top WordPress hosting providers in 2025, what to look for in a host (like customer support, scalability, and built-in security), and how these decisions shape your blog’s growth and user experience.
What Is a Domain Name?
A domain name is your blog’s web address—it’s what users type into their browser to find your site. For example, in www.nichesteps.com, “nichesteps.com” is the domain name.
Think of it like your blog’s street address online. It should be easy to remember, brandable, and relevant to your niche.
Tips for Choosing the Right Domain Name:
- Keep it short and simple: Aim for 15 characters or fewer.
- Avoid hyphens and numbers: These are easy to misread or mispronounce.
- Include niche-related keywords (if possible): For example, a food blog might include “vegan”, “kitchen”, or “mealprep”.
- Stick with .com: Still the most trusted and widely recognized domain extension.
- Make it brandable: Choose something unique and catchy that’s easy to remember.
- Check availability and trademarks: Avoid legal issues by verifying your domain isn’t already in use or protected.
"For The Right domain Company, I recommend Register Your New Blog Domain Name From Namecheap.
How to Register a Domain on Namecheap (Step-by-Step)
If you’re ready to secure your blog’s domain, Namecheap is one of the most trusted and affordable domain registrars out there. Here’s how to register a domain, pay, and set your nameservers—all in just a few minutes.
1. Search for Your Domain
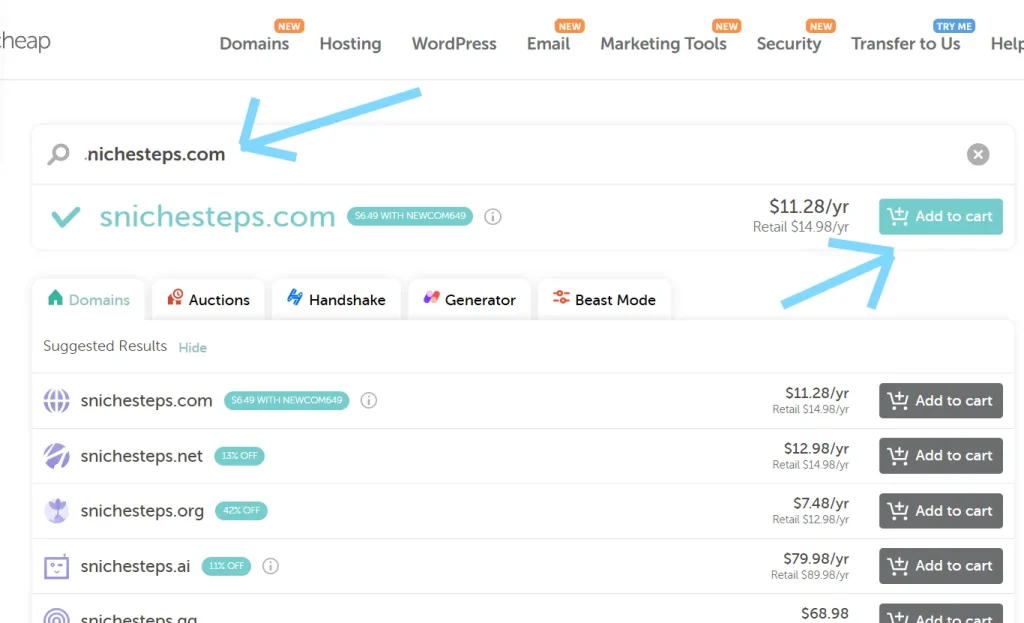
Go to Namecheap.com and type your desired domain into the search bar.
If it’s available, click “Add to Cart” and then “Checkout.”
Tip: Stick with a .com if possible—it’s more trusted.
2. Create Your Account
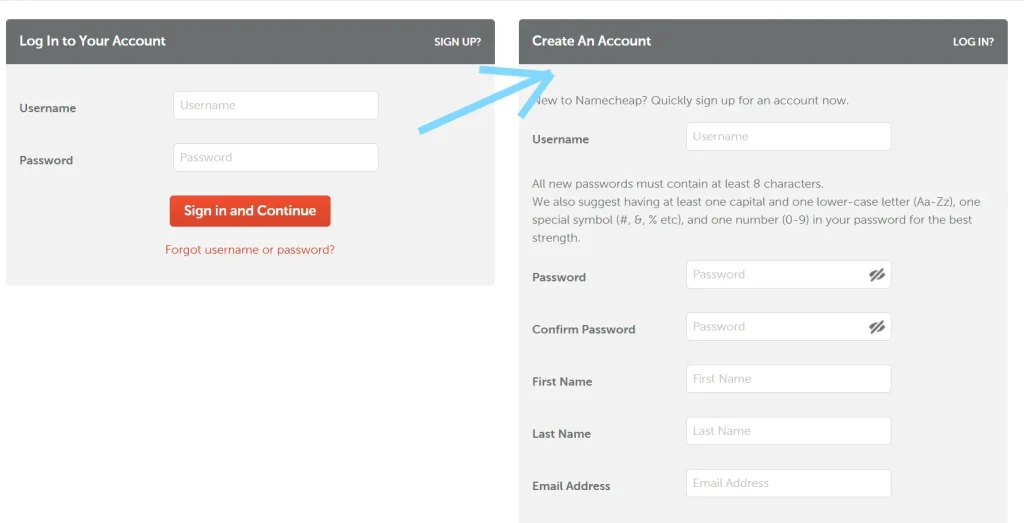
You’ll be asked to sign up for a free Namecheap account.
Just enter your name, email, and set a secure password.
3. Choose Add-ons (Optional)
By default, Namecheap includes free WHOIS privacy protection.
You can skip other paid add-ons unless you specifically need them.
4. Select a Payment Method
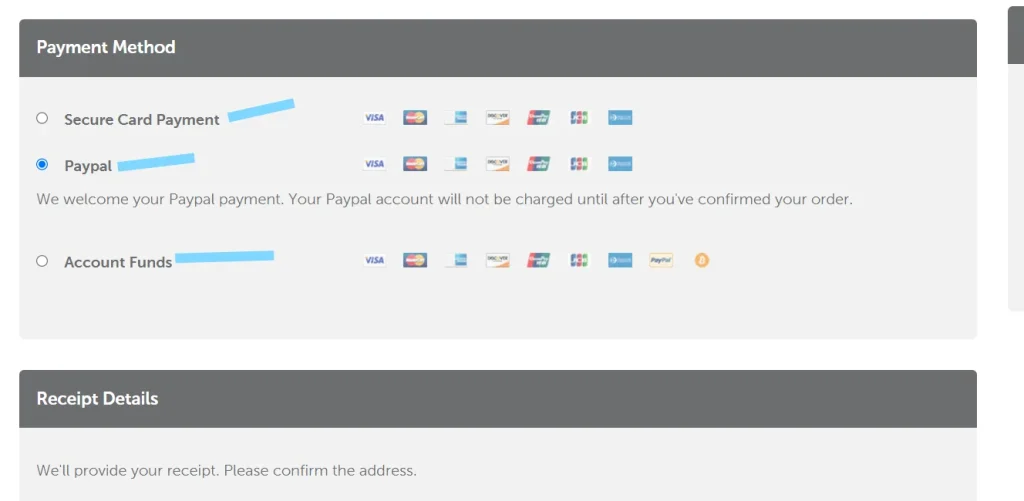
Namecheap accepts:
- Visa/MasterCard
- PayPal
- Apple Pay
- Crypto (like Bitcoin and USDT)
- Namecheap Account Funds
Choose your method and complete the purchase.
5. Access Your Domain Dashboard
Once payment is complete, go to “Dashboard > Domain List” inside your account.
Click “Manage” next to your domain to open its settings to edit for our fourth step.
What Is Web Hosting?
Web hosting is the service that stores your website’s content—your text, images, pages, and files—and delivers it to people when they visit your domain.
If the domain is your address, hosting is your actual house. It’s the space your blog “lives” in online.
Without hosting, your blog can’t exist on the internet.
Your web host is the server where your blog lives. Every page, image, and line of code is stored there—and every visitor’s experience depends on its performance.
If you choose the wrong host, you may experience:
- Frequent site crashes
- Poor SEO performance
- Long load times
- Limited scalability
- Vulnerabilities and poor security
Top Hosting Providers for WordPress Blogs (2025 Edition)
Here are hosting companies we trust and recommend, especially for new bloggers:
"For The Right Hosting Company, We recommend Get Your New Blog Wb Host From FastComet Or a2hosting Or Hostarmada.
Read More: The exact Web Hosting Companies we use and recommend to help you start.
What to Look for in a Hosting Provider:
- Uptime Guarantee: Minimum 99.5% reliability
- Fast Load Speeds: Affects SEO and user experience
- 24/7 Customer Support: You need help when you need it, not just during business hours
- Security Features: Includes SSL, backups, malware scanning, and firewalls
- Scalability: You should be able to upgrade plans as your traffic grows
- Value for Price: Cheap hosting can slow your growth; don’t base this decision on price alone
How to Set Up Web Hosting with FastComet (Step-by-Step)
FastComet is a top-rated hosting provider for WordPress bloggers in 2025, known for its speed, security, and excellent customer support. Here’s how to get started:
1. Visit FastComet.com
Navigate to FastComet.com and click on “Get Started” under the shared hosting plans.
2. Choose Your Hosting Plan
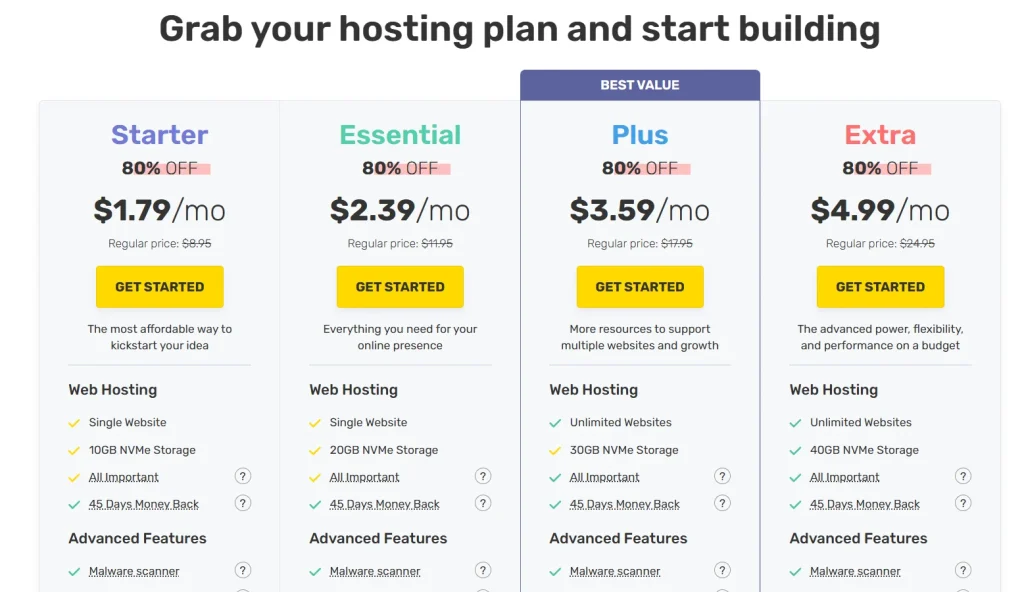
FastComet offers four shared hosting plans, each with an 80% discount for new users:
- FastCloud Starter – $1.79/month (regularly $8.95): Ideal for beginners with a single website and 10GB NVMe storage.
- FastCloud Essential – $2.39/month (regularly $11.95): Suitable for growing blogs needing more resources.
- FastCloud Plus – $3.59/month (regularly $17.95): Supports unlimited websites with 30GB NVMe storage.
- FastCloud Extra – $4.99/month (regularly $24.95): Offers advanced features and 40GB NVMe storage.
*Note: Prices are promotional and apply to the first billing cycle. Renewals are at regular rates.*
3. Register or Connect Your Domain
On the next screen, you’ll be prompted to:
- Register a new domain with FastComet.
- Use an existing domain (e.g., one purchased from Namecheap).
If you already have a domain, select “I already have a domain” and enter it.
4. Create Your Hosting Account
Fill in your personal details:
- Name, email, and password.
- Choose your data center location closest to your target audience for optimal speed.
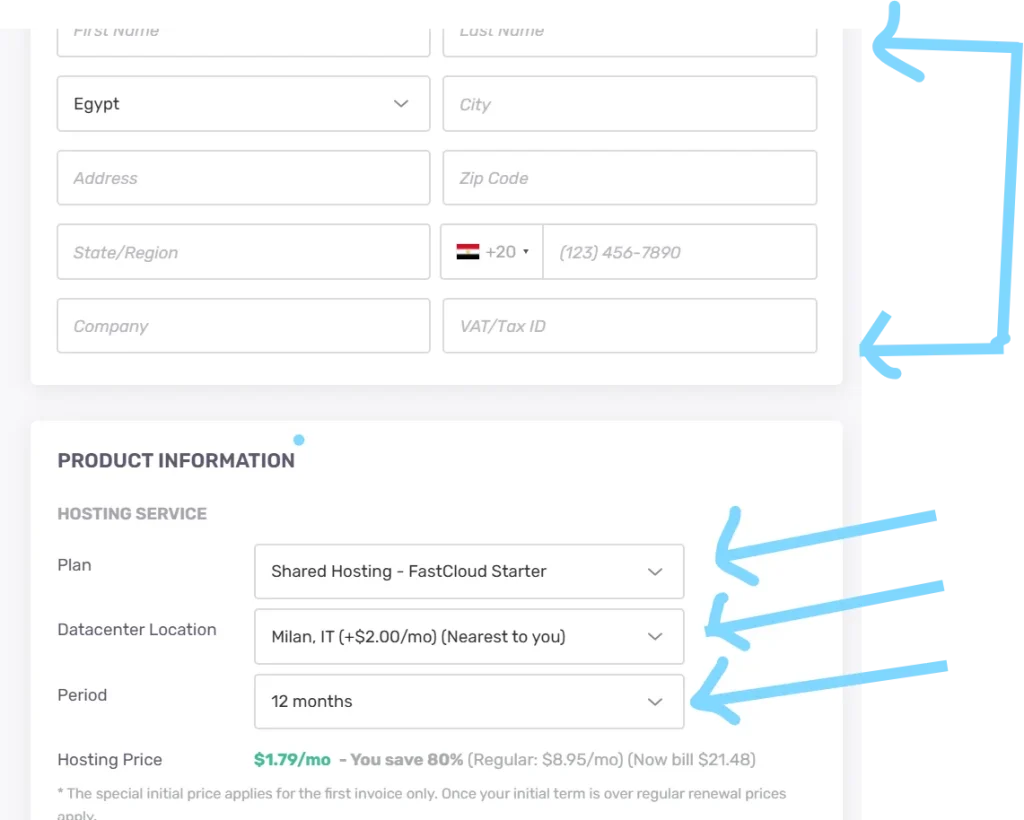
5. Select a Billing Cycle & Add-ons
Choose a billing cycle (monthly, 12 months, or 36 months). Longer terms offer greater savings.
Optional add-ons include:
- Daily backups (often included for free).
- Priority support.
- Malware scanning.
6. Choose Your Payment Method
FastComet accepts:
- Credit/Debit Cards
- PayPal
- Cryptocurrency (e.g., Bitcoin, USDT)
Enter your payment information and click “Complete Order.”
7. Access Your FastComet Dashboard
After payment, you’ll receive a confirmation email. Log in to your FastComet Client Area to manage your services.
Here, you’ll find:
- Your cPanel login.
- Nameservers to connect your domain.
- 1-Click WordPress Installer.
Why Choosing the Right Domain Name & Web Hosting Matters
Choosing these two elements carefully is critical because they directly affect:
1. Your First Impression
Your domain name is the first thing people see or hear. A complicated or unrelated name confuses users and makes it harder to remember your blog.
2. Brand Identity & Trust
A professional, easy-to-spell domain builds credibility. A bad one can instantly turn visitors away. Hosting also plays a role here: if your blog is slow or down often, you’ll look unprofessional.
3. User Experience
Bad hosting leads to slow load times, frequent crashes, and limited bandwidth. This frustrates readers—and Google notices.
4. Search Engine Optimization (SEO)
Fast-loading sites with consistent uptime rank better on search engines. Your domain name’s relevance (containing a keyword or being brandable) can help with click-through rates.
5. Scalability and Security
Choosing the wrong host can make it hard to upgrade your site later. Good hosts offer better security, backups, and support for future growth
Your domain and hosting choices are long-term investments. Treat them like the foundation of a business—because if you plan to grow your blog, that’s exactly what they are.
The Power of a Strong Start
Before publishing a single blog post, your name and infrastructure must be locked in and reliable. Think of your domain and hosting as the foundation of your blogging house. Make them strong now, and you’ll save yourself countless hours—and dollars—later.
Now that you’ve secured a memorable domain name and reliable hosting, you’ve officially laid the digital foundation for your blog. But owning a domain isn’t enough — it’s time to bring your blog to life. In the next step, we’ll walk you through how to connect your domain to your host, install WordPress, and transform a blank canvas into a professional-looking website. From themes to plugins to your first pages — let’s build your blog the right way, step by step.
Step 3: Set Up, Design, and Build Your WordPress Blog
Building a Blog That Looks Professional from Day One
Now it’s time to build your blog. This is where your idea becomes real. The design, layout, and functionality you create in this step will shape your brand’s first impression and future growth.
In this step, you’ll learn:
- How to connect your domain from Namecheap to FastComet hosting
- How to install WordPress using cPanel
- Which core WordPress settings to configure first
- How to install a theme (free or premium)
- How to install and use templates (like Astra starter templates)
- Which essential plugins to install for performance and security
- How to customize your branding (logo, colors, layout)
- Key tips to create a blog that’s clean, fast, and user-friendly
Let’s walk through each stage to get your site up and running the right way.
Connect Your Domain to Hosting (Namecheap + FastComet)
Before you can install WordPress, your domain and hosting must be linked. Here’s how to connect them correctly.
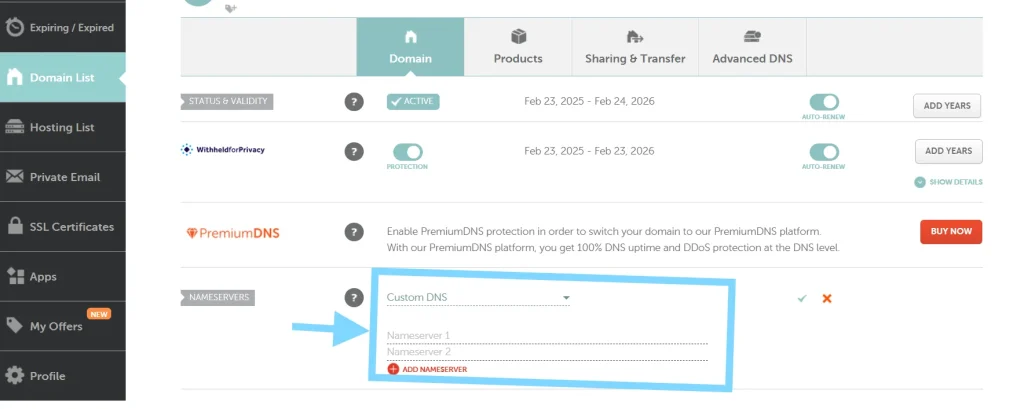
- Log in to your Namecheap account → Go to Domain List → Click Manage next to your domain.
- Under Nameservers, choose Custom DNS.
- Enter the two nameservers provided in your FastComet welcome email (e.g.,
ns1.fastcomet.com,ns2.fastcomet.com). - Click Save. It may take up to 24 hours for DNS changes to propagate globally.
Once your domain points to your hosting server, you’re ready to install WordPress.
Install WordPress via FastComet’s cPanel
With your domain connected, you can now install the WordPress software that powers your blog.

- Log in to your FastComet Client Area.
- Click on Services → My Services → Manage.
- Click cPanel Login.
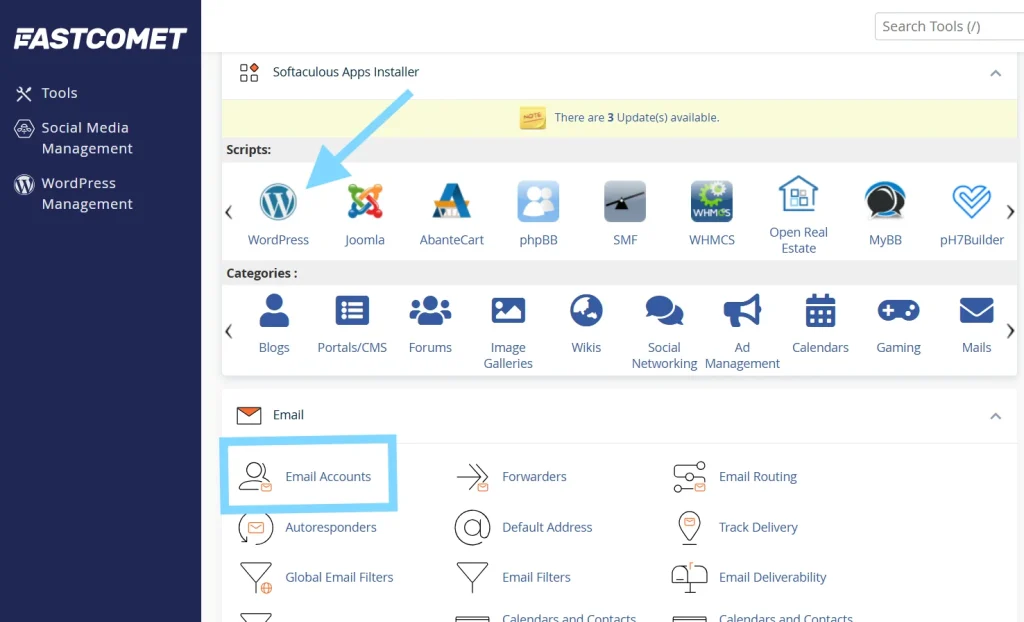
- In cPanel, scroll to Softaculous Apps Installer and select WordPress.
- Click Install Now.
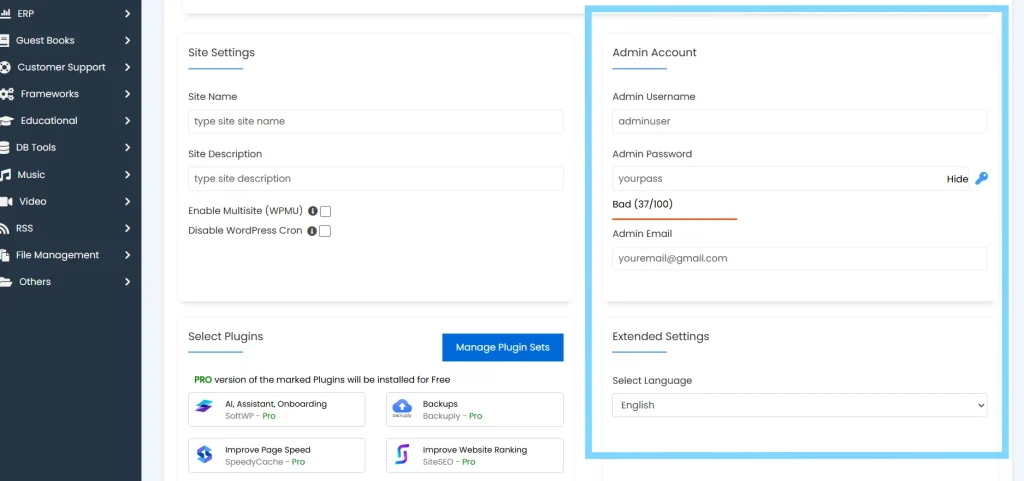
- Fill in your site name, admin username/email/password, and choose the domain you connected.
- Click Install. WordPress will be live within minutes.
Create Your Official Blog Email (Optional but Professional)
Now that WordPress is installed, it’s a good time to set up a professional email address for your blogas seen in screen above.
Inside cPanel:
- Go to Email Accounts → Create Email Account.
- Choose your domain and username (e.g., [email protected]).
- Set a secure password and save the credentials.
Use this for contact forms, business inquiries, and newsletters.
Essential Settings to Configure Right After Installing WordPress

Before designing your blog, let’s set up the foundation for content, SEO, and structure.
- Permalinks → Settings > Permalinks → Choose Post name
- Comments → Disable auto-comments under Discussion settings
- Default Category → Rename or create a relevant one under Posts > Categories
- Users → Add a Gravatar and update your admin profile
- Delete Demo Content → Remove “Hello World” post and default page
- Create Key Pages → Create “Home,” “About,” “Blog,” “Contact”
- Menus → Appearance > Menus → Create and assign your primary navigation
With your core settings in place, you’re ready to begin designing your site.
Install a WordPress Theme (Free or Premium)
Next, let’s give your blog a professional look by installing a theme that matches your goals and audience.
Themes control the look of your blog. Here are 5 popular, fast-loading themes with both free and premium options:
| Theme Name | Known For |
|---|---|
| Astra | Lightweight, fast, easy starter templates |
| Kadence | Modern, customizable, user-friendly |
| GeneratePress | Performance-focused, clean layout |
| Neve | SEO-ready and fast-loading |
| Blocksy | Flexible and optimized for Gutenberg |
Recommended Marketplaces to Buy Premium Themes:
- ThemeForest – Massive variety of niche-specific themes
- template monster – Massive variety of niche-specific themes and templates.
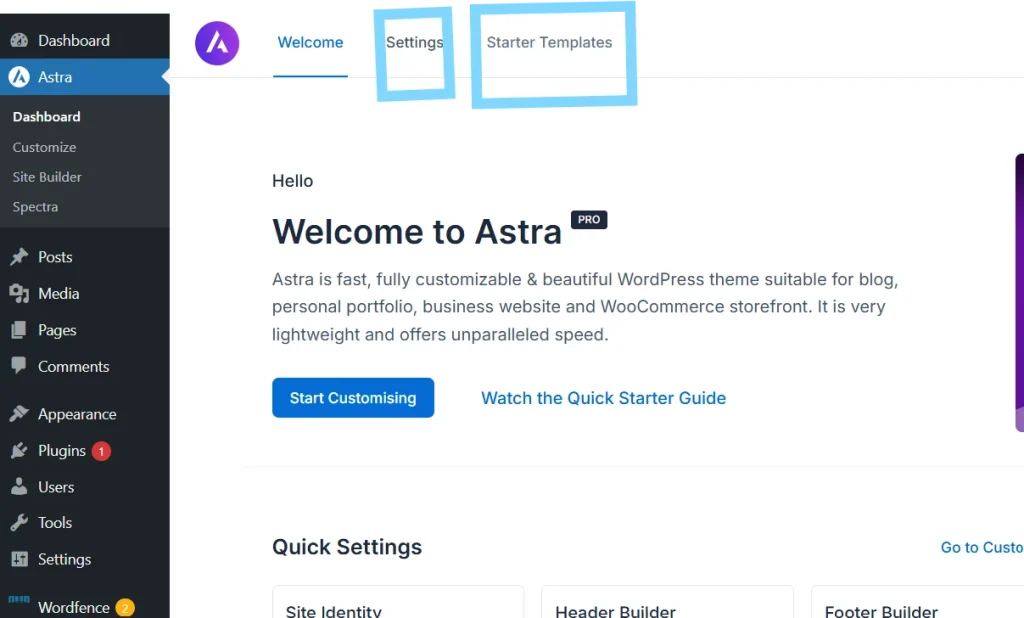
To install Astra Starter Template:
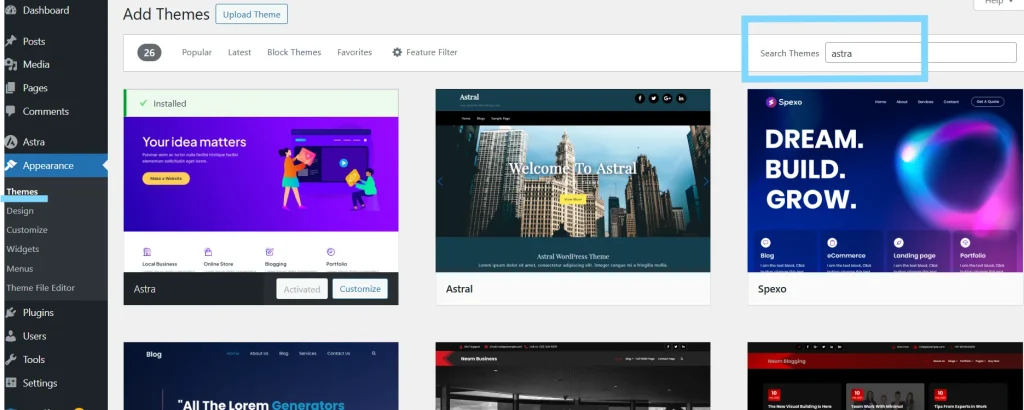
- Go to Appearance > Themes > Add New → Search for Astra → Install and Activate
- go to plugins and Install the Astra Starter Templates plugin
- Choose a starter template (select “Elementor” or “Block Editor”) and import it
With your theme installed, the next step is to enhance functionality using plugins.
Install Must-Have Plugins
go to plugins and Install the all needed plugins like below

Plugins expand your blog’s functionality. Here are essential plugin categories and recommendations:
1. Security Plugins
- sucuri
- Wordfence
- iThemes Security
2. Caching and Speed
- WP Rocket (premium)
- LiteSpeed Cache (if your server supports it)
- W3 Total Cache (free alternative)
3. Page Builder
- Elementor (most popular)
- Spectra (for Astra users)
- Architect (conversion-focused)
- Beaver Builder (beginner-friendly)
- Brizy (lightweight)
4. SEO & Analytics
- Rank Math or Yoast SEO
- Google Site Kit (includes Analytics + Search Console)
Once you’ve installed your key plugins, it’s time to customize your site’s design to reflect your brand.
Customize Your Blog’s Design and Branding
Let’s make your blog feel like yours by tailoring its look and feel.
With your theme installed and plugins activated, it’s time to personalize your site by clicking on customizer under Appearance => customizer:
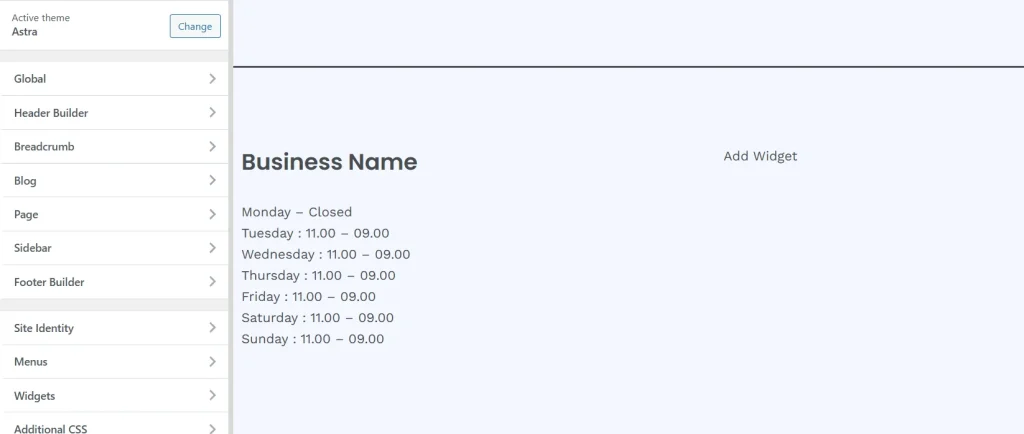
- Upload your logo and site icon
- Set your brand colors and fonts (Appearance > Customize)
- Update homepage layout (via Astra/Kadence starter site or Elementor)
- Set your sidebar and widgets
- Preview your blog on mobile and tablet for responsive design
Focus on clarity, readability, and simplicity. Avoid clutter and stick to 2–3 main colors.
Once your blog looks the part, follow these best practices to finalize your setup.
Pro Tips for a Strong Start
- Keep your design clean—avoid overloading with plugins or pop-ups
- Test your homepage load speed using GTMetrix or PageSpeed Insights
- Use consistent spacing, fonts, and CTAs across your site
- Make sure every page has a goal (email signup, contact, blog post click)
- Set up a basic contact form using WPForms or Fluent Forms
With your blog now live and beautifully designed, you’ve taken a major leap forward — but great design alone won’t bring in readers. What turns a website into a destination is valuable content. In the next step, we’ll dive deep into how to create high-quality blog posts that not only engage your audience but also rank on Google. From keyword research to on-page SEO and AI tools that speed up the writing process — Step 4 is where your blog truly starts to grow.
Step 4: Create High-Quality Content That Attracts Readers
Why Content Is the Core of Your Blog’s Success
Your blog is now live, fast, and designed to impress—but none of that will matter unless you start publishing valuable, well-targeted content. Quality blog posts are what bring in readers, help you rank on Google, and build the authority that eventually turns your traffic into income.
In this step, you’ll learn:
- Why helpful content is your most powerful growth tool
- How to generate blog post ideas your audience is actually searching for
- The different types of blog posts that perform best
- How to do basic keyword research (without needing paid tools)
- How to structure each post for SEO and readability
- What your first 5–10 blog posts should focus on
- Tips for writing content that converts visitors into fans
Let’s walk through how to plan, write, and optimize content that builds real momentum.
Choose Blog Topics That Solve Real Problems
Every great blog post starts with a purpose. Before writing, ask: “Who is this helping, and how?”
Your niche should guide your content direction. Whether you’re in fitness, parenting, finance, tech, or blogging itself—your job is to:
- Solve a specific problem
- Answer common questions
- Offer new ideas, tools, or step-by-step processes
How to Find Blog Post Ideas:
- Google Search Suggestions: Type your main keyword and see what autocomplete suggests.
- AnswerThePublic.com: Find questions people are asking around your topic.
- Reddit, Quora, and Facebook Groups: See what your audience is actively struggling with.
- Competitor Blogs: Analyze the topics their most commented or ranked posts cover.
If you’ve chosen your blog topics, it’s time to make sure people are actually searching for them.
Use Keyword Research to Target Search Traffic
Before you write, you want to know there’s search demand for the topic.
You don’t need expensive tools to start—use this basic process:
- Go to Google and start typing your topic
- Look at autocomplete and People Also Ask box
- Scroll to the related searches at the bottom of the results
- Use Ubersuggest (free) or Keywords Everywhere (browser plugin) for volume
Choose long-tail keywords (4+ words) that show clear intent, like:
- “how to meal prep for weight loss”
- “best travel cameras under $500”
- “how to start a budget blog in 2025”
These are less competitive and more targeted—ideal for new bloggers.
Once you understand how to do basic keyword research, the next step is knowing which tools can make it easier and more effective.
5 Best Keyword Research Tools for Bloggers (Free & Paid)
| Tool Name | Free Plan | Key Features & Use Case |
|---|---|---|
| Ahrefs | ❌ | Advanced SEO tool, keyword explorer, competitor research |
| SEMrush | ❌ | All-in-one SEO tool with keyword gap analysis and PPC data |
| Ubersuggest | ✅ | Great for beginners, keyword ideas, site audits |
| Keywords Everywhere | ✅ | Chrome extension, keyword volume, CPC, competition |
| Google Keyword Planner | ✅ | Free tool from Google Ads with search volume estimates |
Tip: Start with Ubersuggest and Google Keyword Planner, then upgrade to Ahrefs or SEMrush once your blog grows.
Now that you know how to find keywords and tools to support your research, let’s explore the different types of blog posts that bring in the most traffic.
Types of Blog Posts That Work Well
Your content mix should include a variety of post formats to rank in search and engage readers:
| Post Type | Example Title |
|---|---|
| How-To Guides | “How to Start a Blog in 2025: Step-by-Step Guide” |
| Listicles | “10 SEO Tools Every Blogger Should Use” |
| Case Studies | “How I Grew My Blog from 0 to 10,000 Visitors in 3 Months” |
| Product Reviews | “GeneratePress vs Astra: Which WordPress Theme Wins?” |
| Comparison Posts | “WordPress vs Wix for Blogging: What to Choose?” |
| Tutorials | “How to Install a WordPress Plugin (With Screenshots)” |
Write what your audience is already searching for, but add your unique take or better formatting.
Once you’ve structured your content types, enhancing them with strong visuals will make your posts more engaging and effective.
Image Usage Tips for Your Blog
High-quality visuals increase engagement, support SEO, and improve readability. Follow these best practices:
- Use WebP format: Smaller file sizes without quality loss
- Compress images: Use tools like TinyPNG or ShortPixel to reduce file size
- Optimize file names: e.g., “seo-keyword-research-tool.webp”
- Always add alt text: Describe the image and use keywords naturally
- Keep image widths under 1200px: Ideal for fast mobile loading
Recommended Image Sources: Unsplash, Pexels, Pixabay, and Canva
After you’ve chosen your content formats and designed visuals to match, let’s break down how to properly structure each post for SEO and readability.
How to Structure a Blog Post (That Ranks & Converts)
Use this proven format for every article:
1. Catchy SEO-Optimized Title
- Include your primary keyword
- Mention the benefit or outcome
2. Compelling Introduction (100–150 words)
- Hook with a question, stat, or problem
- Explain what the post will teach or solve
- Include your keyword early
3. Use H2 and H3 Subheadings
- Break your content into clear, skimmable sections
- Use keyword variations naturally
4. Add Bullet Points, Tables, or Checklists
- Makes the content easier to digest
- Adds value through visuals
5. Internal Links
- Link to other relevant posts and your service pages
6. External Links
- Link to authoritative sources (WordPress.org, credible stats, tools)
7. Conclusion with CTA
- Recap what the reader learned
- Invite them to take action (comment, read next post, or contact you)
With the format and layout mastered, it’s time to talk about your actual launch content—your first 5–10 blog posts.
Plan Your First 5–10 Blog Posts
To make sure your content efforts align with long-term growth, you’ll want to pair this with a smart publishing strategy and foundational SEO practices. Let’s explore that next.
Your launch content should be:
- Focused around your main niche topic (to build topical relevance)
- Keyword-researched (to rank faster)
- Written for beginner-level readers (broader reach)
Example Starter Post Ideas for a Blogging Niche:
- How to Start a Blog in 2025 (Full Beginner’s Guide)
- 10 Profitable Blog Niches for Beginners
- How to Install a WordPress Theme (Free & Premium)
- Best WordPress Plugins for New Bloggers (2025)
- How to Choose a Blog Name That Stands Out
- WordPress.com vs WordPress.org: What’s the Difference?
- How to Write Your First Blog Post (Step-by-Step)
- How to Create a Content Calendar
- Free Tools Every New Blogger Should Use
- How to Get Your First 1,000 Visitors
To make the writing process easier, here are some helpful tools that can streamline your content creation workflow.
Content Planning, Publishing Strategy, and SEO Tips
Creating consistent content isn’t just about what you publish—it’s about when and how. Building a reliable content strategy will ensure your blog grows steadily over time.
Content Planning Tips:
- Create a content calendar: Plan 1–2 posts per week and stick to a regular publishing rhythm.
- Map keywords to categories: Each content category should be supported by SEO-focused keywords.
- Batch your writing: Write multiple drafts in one session and edit later for clarity and polish.
- Use templates: Create a repeatable blog post structure to save time and maintain quality.
Publishing & Promotion Tips:
- Publish on the same days weekly (e.g., Tuesdays and Fridays) to train your audience.
- Send out posts to your email list within 24 hours of publishing.
- Repurpose posts into social media content, carousels, or newsletters.
Essential SEO Tips:
- On-Page SEO: Use your primary keyword in the title, meta description, first 100 words, and in at least one H2.
- Internal Linking: Link to at least 2–3 relevant older posts or service pages.
- Image SEO: Compress and name images properly, use ALT text.
- Backlinks: Reach out to similar blogs or post guest articles to earn quality backlinks.
- Time Factor: Content takes 3–6 months to rank well. Be patient, consistent, and update posts regularly to stay competitive.
With this strategy in place, your blog will grow steadily, build topical authority, and become more profitable over time.
Now let’s move into the tools that help streamline your writing workflow.
Writing Tools and Content Creation Workflow
Before we jump into the tools, it’s important to understand how to analyze what you publish. Insightful tracking helps you double down on what works and refine what doesn’t.
Analyzing Your Blog Content: Why, How, and Tools to Guide You
Once your blog is up and running, the real work begins—measuring your content’s performance. Tracking your progress ensures you’re creating content that resonates with readers and ranks well.
Why Analyze Blog Content?
- Discover what type of posts drive the most traffic
- Identify which pages keep visitors engaged or convert best
- Optimize underperforming content for better results
How to Analyze Blog Performance:
- Track your organic traffic growth weekly or monthly
- Monitor bounce rate, average time on page, and click-through rates
- Review your top pages, keywords, and traffic sources
Recommended Tools:
- Google Analytics 4 (GA4) – Essential for measuring traffic, engagement, and audience behavior
- Google Search Console – Track keyword performance, impressions, and indexing
- Microsoft Clarity – Free heatmaps and session recordings to see how users interact
- Ahrefs / SEMrush – Monitor backlinks, keyword rankings, and competitor performance
- RankMath / Yoast SEO – Built-in analytics and SEO scores within WordPress
Make a habit of reviewing your blog analytics every 2 weeks, and set monthly goals tied to traffic, rankings, or conversions. This will help you stay intentional and improve over time.
Now let’s explore the tools that help streamline your writing workflow.
These tools can help speed up your process and improve content quality:
- Grammarly: Fix grammar and improve clarity
- Hemingway Editor: Write with simpler, bolder language
- Google Docs: Easy collaboration and formatting
- Notion or Trello: Content planning boards
- Unsplash or Pexels: Free blog images
- ChatGPT: Idea generation and outlining (but always human-edit your content)
If you’re ready to level up and save even more time, let’s explore the best AI-powered tools bloggers are using right now.
If you’re ready to scale up your writing and speed without compromising quality, here are the best AI tools bloggers are using in 2025.
Top 10 AI Writing Tools for Bloggers (Free & Paid)
| Tool Name | Type | Free Plan | Key Features |
|---|---|---|---|
| ChatGPT | General AI | ✅ | Content ideas, outlines, basic drafts |
| Jasper | Copywriting | ❌ | Long-form blog posts, brand voice, templates |
| Copy.ai | Marketing AI | ✅ | Blog intros, social media posts, product descriptions |
| Writesonic | SEO & AI | ✅ | Full blog articles, keyword tools, image suggestions |
| Surfer SEO AI | SEO Writer | ❌ | SEO-focused content editor with keyword scoring |
| Scalenut | AI + SEO | ✅ | AI content plans + real-time SEO guidance |
| INK Editor | SEO Assistant | ✅ | Optimizes for rankings + plagiarism checks |
| Wordtune | Rewriter | ✅ | Sentence rewriting, tone adjustments |
| Rytr | Multi-purpose | ✅ | Templates for blogging, emails, ads |
| Neuroflash | GPT-based | ✅ | Supports 20+ languages + SEO content assistant |
Pro Tip: Use these tools to speed up your writing, not replace it. Let AI help with outlines, formatting, and SEO—but make sure your personality and human touch shine through.
Finally, here are some practical writing habits and strategies that will help you write better, clearer, and more valuable content for your readers.
Pro Tips to Write Better Blog Content
- Always write for your reader, not just search engines
- Use second-person voice (“you”) to feel personal
- Add real-life examples or analogies to clarify ideas
- Write short paragraphs (2–4 lines max)
- Preview on mobile to ensure readability
- Use strong intros and skimmable formatting
- Edit twice before publishing
Need Best Blogging Results, Read This : 109 Blogging Mistakes To Avoid
Publishing great content is just the beginning — but even the best-written blog post won’t make an impact if no one sees it. That’s where promotion comes in. In Step 5, we’ll show you how to get eyes on your content using free and paid strategies. From social media sharing to backlink building, email marketing to blog directories — you’ll learn how to drive consistent traffic to your blog and start growing your audience the smart way.
Step 5: Start Promoting Your Blog and Get Traffic

Why Promotion Is Just as Important as Publishing
You’ve built a beautiful blog, optimized your content, and hit “Publish.” Now what?
The reality is—great content doesn’t promote itself. Promotion is how your blog gets discovered, grows traffic, builds authority, and ultimately generates income. Whether you’re using free methods or investing in ads, effective promotion is what transforms effort into results.
In this step, you’ll learn:
- The difference between free and paid promotion (and when to use each)
- How to build a content distribution strategy
- The top platforms and tools to reach more readers
- Proven traffic tactics that work in 2025
Let’s explore both free and paid promotion strategies and the tools that can help you scale them.
To build momentum without spending money upfront, let’s start with proven free traffic methods that can bring in long-term results.
Free Blog Promotion Strategies (Organic Traffic Growth)
Free promotion relies on content optimization, consistency, and community. Here are the most effective free methods bloggers use:
1. Search Engine Optimization (SEO)
- Optimize every blog post for keywords
- Build internal links across posts
- Acquire backlinks from other blogs
- Submit your sitemap to Google Search Console
Top 5 Free SEO Tools:
- Google Search Console
- RankMath SEO Plugin
- Ubersuggest (limited free plan)
- Screaming Frog SEO Spider (free version)
- Ahrefs Webmaster Tools (AWT)
Once your SEO foundation is in place, it’s time to tap into the platforms your audience already uses daily.
2. Social Media Promotion
- Share your content on platforms where your audience hangs out
- Use Twitter threads, LinkedIn posts, Pinterest pins, or Instagram carousels
- Join niche groups or use relevant hashtags to expand reach
Top 5 Social Media Tools:
- Buffer (free version)
- Canva (for design)
- Twitter/X native scheduling
- Facebook Groups
- Pinterest Trends
While social media helps with visibility, building your email list gives you direct access to your audience every time you hit publish.
3. Email Marketing
- Build a simple lead magnet (eBook, checklist, resource)
- Add sign-up forms to your blog
- Send each new post to your subscribers
Top 5 Free Email Tools:
- MailerLite (up to 1,000 subs)
- ConvertKit Free Plan
- Brevo (formerly Sendinblue)
- Mailchimp Free Plan
- Systeme.io (email + landing pages)
Ready to grow your reputation and authority in your niche? Let’s explore how strategic partnerships can do just that.
4. Guest Posting and Collaborations
- Write guest posts for other blogs in your niche
- Collaborate with influencers or bloggers to swap promotions
- Link to each other’s posts for SEO
Top 5 Guest Posting Tactics:
- Find “write for us” pages in your niche
- Use search operators like: keyword + “guest post”
- Pitch personal stories or case studies
- Offer value: include data or examples
- Focus on blogs with engaged communities
In addition to content and partnerships, active participation in online communities can bring steady traffic and build trust.
5. Forums and Communities
- Share posts on Reddit (subreddits related to your niche)
- Answer questions on Quora and link back to blog posts
- Join Discords or Slack groups related to your topic
Top 5 Forums/Communities:
- Reddit (subreddits like r/Blogging, r/SEO)
- Quora
- Indie Hackers
- Facebook Groups
- Medium (republish and link to your site)
Now that we’ve covered free traffic methods, let’s look at how paid strategies can accelerate your blog’s growth.
Paid Blog Promotion Strategies (Fast Traffic + Visibility)
If you’re looking to scale traffic fast or launch a digital product, paid traffic is worth considering. Here are the best options:
1. Search Ads (Google Ads)
- Appear at the top of search results for key phrases
- Drive traffic to high-converting blog posts or landing pages
Top Tools for Search Ads:
- Google Ads
- Keyword Planner
- SE Ranking PPC Tool
- SpyFu (see competitors’ ads)
- AdEspresso
Want to expand your reach beyond your followers? Paid social ads can bring instant attention to your posts.
2. Social Media Ads
- Run paid campaigns on platforms like Facebook, Instagram, Pinterest, and Twitter
- Promote lead magnets, popular blog posts, or email sign-ups
Top Tools for Social Ads:
- Facebook Business Suite
- Meta Ad Library (spy tool)
- Canva Pro (ad design)
- Hootsuite Ads
- Pinterest Business
If you prefer more natural placements alongside content your audience already reads, native ads are a powerful option.
3. Native Advertising
- Place your blog articles inside recommendation boxes across high-traffic sites
- Uses platforms like Taboola and Outbrain
Top Tools for Native Ads:
- Taboola
- Outbrain
- RevContent
- MGID
- AdStyle
For bloggers looking to leverage established audiences, collaborating with influencers and running sponsored content can deliver high ROI.
4. Sponsored Content & Influencer Campaigns
- Pay influencers or websites to feature your post or brand
- Focus on creators in your niche with engaged followers
Top Sponsored Content Platforms:
- Collabor8
- Intellifluence
- Upfluence
- Aspire.io
- Trend.io
Video content is booming, and YouTube offers huge potential for blog traffic when used strategically.
5. YouTube Ads and Video Boosting
- Promote your blog with short videos or video explainers
- Use Google Ads for YouTube campaigns
Top Tools for Video Ads:
- Google Ads (YouTube integration)
- TubeBuddy
- VidIQ
- InVideo (video creation)
- Lumen5 (turn blog posts into videos)
Whether you’re promoting through organic or paid channels, consistency is key to building traffic over time. Here’s how to stay on track.
Create a Promotion Schedule That Works
Just like content publishing, consistency in promotion compounds over time. Here’s a simple plan to start with:
| Day of Week | Promotion Task |
|---|---|
| Monday | Share blog post on Twitter, LinkedIn, Pinterest |
| Tuesday | Answer 3 Quora questions with blog links |
| Wednesday | Email list about the new post |
| Thursday | Engage in 2 Facebook or Reddit groups |
| Friday | Repurpose post into carousel or short video |
Track your most effective traffic channels in Google Analytics, and double down where results grow.
You’ve done the hard work of building and promoting your blog—now it’s time to reap the rewards. In the next section, we’ll show you how to transform that hard-earned traffic into real, sustainable income with smart monetization strategies.
Step 6: Start Monetize Your Blog – Proven Ways to Make Money Blogging in 2025

You don’t need to wait for 100,000 monthly visitors to make money. With the right strategies, your blog can start generating income as early as your first few thousand pageviews.
In this final step, you’ll discover:
- The most profitable monetization models for 2025
- How to choose the best one based on your blog’s stage
- Real tools and platforms to implement them
Let’s explore the most reliable ways to turn your blog into a business.
1. Affiliate Marketing
Promote other people’s products and earn a commission when readers click your links and make a purchase.
Best Niches:
- Tech (promote software/tools)
- Lifestyle (Amazon, fashion)
- Blogging (hosting, plugins, courses)
Top Affiliate Platforms:
- ShareASale – Blog-friendly marketplace for digital & physical products
- CJ Affiliate – Large network, works great for niche retailers
- Impact.com – Used by Canva, Shopify, and top SaaS brands
- ClickBank – Digital info-products & courses
- PartnerStack – B2B SaaS affiliate programs
Tools to Help: ThirstyAffiliates, Pretty Links, Lasso
2. Display Advertising
Place banner ads on your blog and get paid for views or clicks (passive income).
Best Ad Networks:
- Google AdSense – Entry-level with low payout thresholds
- Ezoic – Higher payouts and more control (requires 5K+ visits/month)
- Mediavine – Premium, high-paying (50K sessions/month)
- AdThrive – Top-tier network (100K+ sessions/month)
- SheMedia – Great for lifestyle and parenting blogs
Tips: Optimize page speed and ad placement to improve revenue.
3. Sponsored Posts & Brand Collaborations
Get paid by brands to write about their products or services.
Where to Find Opportunities:
- Reach out to relevant brands in your niche
- Use platforms like:
- Influencity
- Collabor8
- Aspire.io
- Intellifluence
- IZEA
Pro Tip: Have a “Media Kit” page on your blog outlining traffic stats, niche, and services.
4. Sell Digital Products
Create your own products with no inventory or shipping required.
Top Ideas:
- eBooks, templates, checklists
- Canva templates or Notion planners
- Printables (journals, planners)
- Online courses or email challenges
Tools to Sell:
- Gumroad
- ThriveCart
- SendOwl
- Podia
- Payhip
5. Offer Services
Turn your blog into a portfolio and get hired as a freelancer or consultant.
Service Ideas by Niche:
- Tech: Web design, SEO audits, WordPress fixes
- Fitness: Custom workout plans, coaching
- Finance: Budget planning, investing tips
- Blogging: Pinterest management, content writing
Tools to List Services:
- Your Contact Page + Calendly
- Fiverr or Upwork
- HoneyBook (CRM for freelancers)
6. Launch a Paid Membership or Community
Create an exclusive space with premium content or support.
What You Can Offer:
- Weekly live Q&As
- Behind-the-scenes tutorials
- Downloadable tools or templates
Platforms to Use:
- Patreon – Flexible and beginner-friendly
- Buy Me a Coffee – Good for tips and donations
- MemberPress – WordPress plugin for gated content
- Circle.so – Community and courses combined
- Podia – Host memberships, products, and email
Read More : Top 25 Proven Ways to Make Money with WordPress
Final Monetization Tips
- Focus on 1–2 methods at first. Don’t spread yourself too thin.
- Test, track, and optimize. Use Google Analytics, Hotjar, or Microsoft Clarity to see what works.
- Build trust first. Valuable content always comes before monetization.
With these monetization strategies in place, your blog is now positioned to generate real, sustainable income.
Congratulations! You’ve completed all 6 steps to build and grow a profitable blog in 2025.
Stay consistent, keep learning, and refine your blog as your audience and goals evolve. You’re well on your way to turning your blog into a true digital asset.
Want help implementing what you’ve learned? Contact Us or check our services to accelerate your blogging journey.
Let us know your thoughts—what’s your favorite monetization method or what do you plan to implement first? We’d love to hear from you in the comments below!
hi
it is a greet full blog post
thanks for your time
Thanks
Happy to see you here